Showing posts with label family fun. Show all posts

Monday, June 4, 2012

Free Day at This is The Place Heritage Park!

Huntsman Hotel at This is the Place Heritage Park

Here is your opportunity to visit This is The Place Heritage Park for FREE!  Jon and Karen Huntsman sponsor a free day at the park once a year.   This is a fun place to wander, learn a little about Utah history, experience pioneer life, and more. You can see baby animals, restored pioneer-era buildings, and artisans demonstrating their skills.  Sample a sarsaparilla, or take a ride on the train.  Volunteers and staff dress in period clothing and tell you about the early life of settlers in the Salt Lake Valley.  There is plenty to do at This is The Place.  Be sure to look at the statues and monuments when you drive in.

This year the free day is Friday, June 8, 2012.  Free admissions are available between 10am and 5pm, and there is also free ice cream, so pack up the kids and enjoy some time at This is the Place!

This is the Place Heritage Park is located at 2601 E. Sunnyside Ave. in Salt Lake City (north of Hogle Zoo).


Wednesday, September 7, 2011

The Art of Camping - Sanitation Station

Camp "Sanitation Station"

This year at our campground, there was not a tap right by our camp.  Although the vault toilets and a tap were nearby, it was really convenient to have a way to wash up right in camp.  Our camp sanitation station consisted of a line with towels for drying hands and dishes (bring extra towels if you are camping a few days), and a water jug with soap attached.

Washing station

Fill a sturdy jug with water and suspend it from a tree.  I use an old piece of nylon stockings to hold the soap. The soap easily suds hands through the nylon, and doesn't fall in the dirt while you are using it.  A golf tee on a string plugs a hole in the bottom of the jug.  When pulled out, it releases a stream of water to wet and rinse your hands.  If the jug is in the sun during the day, you can even get warm water!

Golf tee plug in the water jug

Don't set up this station too near your tent, as you don't want water and mud running into your lodgings.  However, with the small stream of water, it usually doesn't get too messy at the sanitation station.

Keeping dirt OUT of the tent.

A doormat is a great help in keeping dirt out of your tent.  We try to enforce a "no shoes in the tent" policy, and it really helps when it is time to pack up the tent and go home.  (In really bad weather, sometimes we have to allow shoes just inside the tent door so they don't get soaked outside). 

This year I found a great doormat made out of flip-flops at Bed, Bath and Beyond.  It rolls up, is waterproof, thick, and durable.  It is a great addition to our camping equipment, and will hopefully grace the front of our tent for several years to come.

With a little creativity and effort, you can minimize some of the dirt and mess of camping!

For more camping tips see:


Sunday, August 21, 2011

The Art of Camp Cooking - Dinner

For our camp dinners this summer, we really went with the tried and true.  The first night we roasted hot dogs over the campfire, and then made s'mores.  The second night we made foil dinners and dutch oven dessert.  We seasoned our hamburger and divided it into patties at home.  Then at camp, we only had to slice vegetables and assemble the dinners.  We used potatoes, carrots, green peppers, and onion.  Assemble everything on your sheet of foil, season as desired, and fold the foil into a packet.  We double-wrapped ours.

Putting together a foil dinner

We started a fire to prepare coals before putting the dinners together.  Our fire was very hot, and the coals actually died out rather quickly (apparently the type of wood you use matters), so we ended up using some charcoal we had started for the dutch oven dessert.  Then, of course, we had to start more coals for the dutch oven, but one of the fun things about camping is changing your pace of life and not being on the clock, and just rolling with things as they come up!

Getting coals ready for cooking

Cooking the foil dinners on the coals.

We cooked our foil dinners about 20 minutes per side.  You can hear them steaming and sizzling when they are getting done.  Mine turned out great!  No raw hamburger or crunchy potatoes this time!

One of our campers shows off his foil dinner.

A large salad balanced the meal.

Before eating our foil dinners, we made a simple dutch oven dessert.  This cobbler requires hardly any preparation.  First, we opened 2 cans of pie filling (we chose raspberry).

Starting the dutch oven dessert - pie filling

Adding the cake mix.

We then added a box of white cake mix.  After that, we poured a can of lemon-lime soda (I used Sprite) over the whole thing.  Pour slowly to keep fizz at a minimum.  Then we cooked everything in the dutch oven.  We used about a 3 to 1 ratio of top to bottom coals...7 -8 coals on the bottom, 21 - 24 on the top.  Our dutch oven is a 12 inch "deep" oven, so with a shallower or smaller oven, you could probably use fewer coals.  This dessert took about an hour.  Turn the lid and rotate the oven a couple of times while cooking.

Dutch oven dessert cooking while the foil dinners finish in the firepit.

Raspberry cobbler - dig in!

It was great eating a warm cobbler by the campfire.  We even had whipped cream to top it off.

Note:  heat water and clean your dutch oven after use.  We scrubbed ours out with a bristly brush and hot water, then put it back on the coals until the water evaporated.  Afterwards, coat your oven with a thin layer of cooking oil while still hot.  This keeps it seasoned for the next use. 

Happy camping!


Friday, August 19, 2011

The Art of Camp Cooking - Breakfast

This year on our camping trip we decided to go with simple, traditional camp cooking.  Our son introduced us to a breakfast we hadn't tried at camp before:  omelets in a bag (big shout out to his Scout leader!)  I was a bit skeptical, not really wanting to eat something with the consistency of powdered eggs, but this was a simple, savory breakfast with almost no clean-up.

Omelet in a bag - step one

First, prepare your omelet ingredients.We had diced ham, chopped chicken, onions, green peppers, cheese, and salt and pepper.  Everyone assembles their own customized ingredients into their individual quart-sized plastic freezer bag.

Add your eggs!

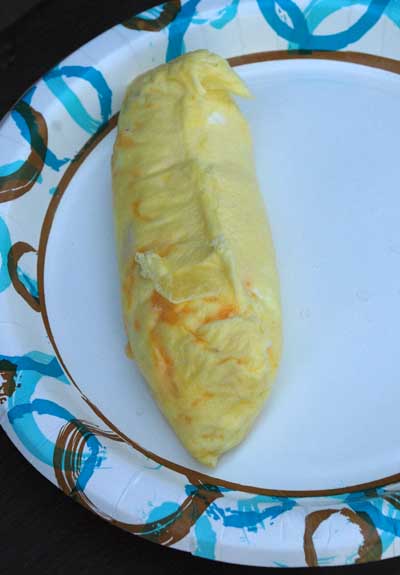
After you put in your ingredients, break an egg or two into your bag, and mash it up until the egg and all ingredients are mixed together.  (Don't get shell in your bag, unless you want your omelet to have extra crunch!)  Squeeze all the air you can out of the bag, seal the zip opening, and then put it in a pot of boiling water.  We boiled our water on a Coleman camp stove. Check your bag once in awhile, and swish it to other spots in the pot so that  it cooks evenly.  (Sorry, I didn't time how long this takes, but allow several minutes...the eggs are thicker cooking them this way).  You can cook several omelets at once.

Remove your cooked omelet from the bag.

When your eggs are the consistency you like, remove the bag, empty it on a plate, and enjoy your "breakfast burrito!"  These were very delicious, and I think we'll do these at home on the stove on those mornings when everyone wants an omelet at once.

Voila!  Omelet from a bag.

Breakfast is served!

I don't know what it was about this cooking method, but the flavors from the onions and peppers really permeated the omelet, and it was delicious!  Besides, everything tastes better outdoors.

If you are concerned about cooking in plastic bags, you may want to read up on it.  Here is one link that might be helpful.  I think the risk of a once-a-year bag omelet is worth it for the convenience and taste!

Wednesday, July 20, 2011

Days of 47 Float Preview

Float depicting Wilford Woodruff fly fishing.

Celebrate Pioneer Day early with the Days of 47 Float Preview.  This two day event takes place at the South Towne Expo Center, and is FREE.  It runs July 20 and 21, from 11am to 9pm.  If you have ever wanted to see a float up close in air-conditioned comfort, this is your chance.  Some of these floats have moving parts or characters.  One float this year even has a waterfall (with running water).  It is hard to imagine the hours and dedication it takes to put one of these together.

This float honors the diversity of churches in Utah.

If you have questions, there are people around who actually worked on these floats who are happy to talk to you about their projects.  Many floats have displays nearby that show the progress of putting the whole thing together.  Some people are handing out candy, and on one float, kids could even have their pictures taken with a mermaid.  One woman told me she traced 1864 leaf patterns to construct 932 leaves on the tree on their float.  Just thinking about cutting out all of those foam shapes makes my hand ache! There are balloons and face painting for children, as well as live entertainment during the event.


Flower detail from one of the floats.

Take the time to examine these floats in close detail.  Some have foam flowers, like these.  One float had live plants and flowers all over it.  Then step back to get the big picture.  These are amazing creations.   Don't forget to pick up a ballot and vote for your favorite!  This is how the People's Choice Award and Children's Choice Award are selected for the big parade on Monday.

Float from Draper, Featuring Eggs

I even learned a little bit of history while strolling through the floats.  Draper, Utah apparently was nicknamed the Egg-basket of Utah.  Who knew?  In the 1920s, the farmers formed an egg co-op, and during World War II, they provided eggs to US servicemen all over the world.

Hole in the Rock float

This float depicts a harrowing wagon journey from Utah pioneer history.  Floats in this parade honor many different cultures and heritages and reflect Utah's ever-growing diversity.  The Days of 47 parade began in 1849, and has become a wonderful Utah tradition. I hope it continues for a long while to come.

IF YOU GO:
South Towne Expo Center
9575 S. State Street
Sandy, Utah
FREE
Tuesday and Wednesday, July 20 & 21, 2011
11am to 9pm